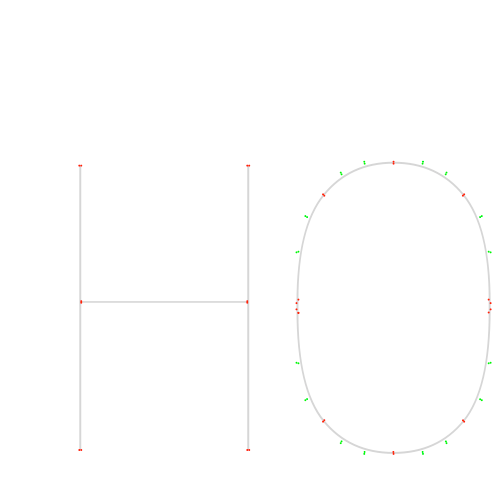
You could create an imageObject of the background, but I believe you get pixels instead of outlines.
Maybe you can create the whole background in one BezierPath? I’m not sure, but it seems possible to append multiple paths to one BezierPath.
You could create an imageObject of the background, but I believe you get pixels instead of outlines.
Maybe you can create the whole background in one BezierPath? I’m not sure, but it seems possible to append multiple paths to one BezierPath.
I don’t believe it’s possible with DrawBot’s Variables.
It might be possible to use DrawBot with Vanilla and create your own interface, but I have no first hand experience with that.
Also, the example script on that page does only work for me if I add this at the top:
from PyObjCTools import AppHelper
and this at the bottom:
AppHelper.runEventLoop()
The thing that tripped me up initially was ‘Returns a single-pixel image…’. I was (mis)reading that and assumed that ‘returns’ meant ‘returns a new image’ instead of altering the imageObject.
I’m not sure if the documentation is a little confusing, or that the behaviour of areaAverage is unexpected.
@micahmicah Maybe, if the last segment is a line, the last point is not updated?
Maybe change:
# IF IT'S A LINE DRAW A LINE
if len(segment) == 1:
x,y = segment[0].x, segment[0].y
P.lineTo((x,y))
#SHOW POINTS
rect(x-diameter/2,y-diameter/2,diameter,diameter)
to:
# IF IT'S A LINE DRAW A LINE
if len(segment) == 1:
x3,y3 = segment[0].x, segment[0].y
P.lineTo((x3,y3))
#SHOW POINTS
rect(x3-diameter/2,y3-diameter/2,diameter,diameter)
(I’m coding blind, I have not tested this)
@micahmicah I have no experience with RoboFont, but I assume this wil work. The trick is to remember the last point and use that as the first point.
g = BezierPath()
g.oval(0,0,500,500)
newPage(1000,1000)
P = BezierPath()
diameter = 10
translate(240,100)
# DRAW CONTOURS
for contour in g.contours:
# DEFINE STARTING POINT
x3,y3 = (contour[0][0][0],contour[0][0][1])
P.moveTo((x3,y3))
for segment in contour:
# LAST POINT BECOMES THE FIRST POINT
x0,y0 = x3,y3
# IF IT'S A CURVE DRAW A CURVE
if len(segment) == 3:
x1,y1 = segment[0][0], segment[0][1]
x2,y2 = segment[1][0], segment[1][1]
x3,y3 = segment[2][0], segment[2][1]
P.curveTo((x1,y1),(x2,y2),(x3,y3))
# SHOW THE OFF CURVE POINTS
oval(x1-diameter/2,y1-diameter/2,diameter,diameter)
oval(x2-diameter/2,y2-diameter/2,diameter,diameter)
# SHOW THE ON CURVE POINTS
rect(x3-diameter/2,y3-diameter/2,diameter,diameter)
# DRAW A LINE
stroke(0)
line((x2,y2),(x3,y3))
line((x0,y0),(x1,y1))
# IF IT'S A LINE DRAW A LINE
if len(segment) == 1:
x,y = segment[0][0], segment[0][1]
P.lineTo((x,y))
#SHOW POINTS
rect(x-diameter/2,y-diameter/2,diameter,diameter)
P.closePath()
fill(None)
stroke(0)
drawPath(P)
areaAverage() does not return anything, but changes the imageObject.
p = 'schrofer_head.jpg'
im = ImageObject(p)
print(im.size()) # (1365.0, 1365.0)
im.areaAverage()
print(im.size()) # (1.0, 1.0)
print(imagePixelColor(im, (0, 0))) # (0.6, 0.6039215686274509, 0.6, 1.0)
Using almost the exact same script of @gferreira (only added the generated image on top of the shapes) I get a QR code that is not very crisp.
Am I doing something wrong? Or has something changed since 2020?
path = bytes('http://www.drawbot.com/', 'utf-8')
w, h = 31, 31
s = 10
img = ImageObject()
img.QRCodeGenerator((w, h), path, 'Q')
size(w*s, h*s)
for x in range(w):
for y in range(h):
c = imagePixelColor(img, (x, y))
fill(*c)
rect(x*s, y*s, s, s)
image(img, (0, 0))
Hi @jo,
I don’t have an answer or solution, but maybe there is a way to circumvent the error message.
When I place a Drawbot pdf in InDesign I don’t get an error. If I place a pdf with ‘Show Import Options’ checked, the Crop to: options is pre-selected to ‘Media’.
Maybe your selection is set to ‘Trim’, and the error message will disappear when you change that?
@crackheroine I have little experience with creating UI for DrawBot, and no experience with Vanilla or tkinter. So, I would love to see your results here, if you are willing to share.
If a very basic UI is sufficient, maybe you can use the Variable() funtion?
Yes, macOS only.
From the GitHub page: ‘This module only works on Mac OS as it requires PyObjC, AppKit, CoreText Quartz and more.’
I found a way.
newPage(2000,2000)
# Red Rectangle
path2 = BezierPath()
path2.text("2", fontSize=200, offset=(200,300))
with savedState():
fill(1,0,0)
x = path2.getNSBezierPath().bounds().origin.x
y = path2.getNSBezierPath().bounds().origin.y
w = path2.getNSBezierPath().bounds().size.width
h = path2.getNSBezierPath().bounds().size.height
rect(x,y,w,h)
drawPath(path2)
I’m not sure if this is even allowed, maybe @frederik will take some reputation points away from me ;-). Also, I’m not sure if the way offset works is correct, or if it’s a bug.
Personally, I would just wrap your fourth solution in a savedState() and accept all the translations of the canvas. I think that would be the DrawBot way.
# Magenta Rectangle
with savedState():
translate(900,800)
path4 = BezierPath()
path4.text("4", fontSize=200)
with savedState():
fill(1,0,1)
rect(*path4.bounds())
drawPath(path4)
I use Sublime Text for all coding except for DrawBot. This looks useful. However, I have little experience with snippets.
To use them in Sublime Text, I have to put every snippet in it’s own file? Something like this?:
Or is there a way to use the one file with all snippets?
You could combine that with bitmapFont-Drawbot.py from Connor Davenport, which will give you something like this:
Do you mean something like this?
w = 1920
h = 1080
columns = 13
spacing = w/(columns+1)
fs = 60
duration = .25
txt = 'ABCD'
frames = columns+len(txt)+1
for frame in range(frames):
newPage(w, h)
frameDuration(duration)
fontSize(fs)
# white background
with savedState():
fill(1)
rect(0,0,w,h)
for column in range(columns):
x = spacing + column * spacing
# Use the frame count as starting position for the text.
# frame-len(txt) makes sure the start of the text is outside the row of characters
if column >= frame-len(txt) and column < frame:
# txt[0] gets the first character, A, txt[1] gets the second, etc.
# txt[column-frame] makes sure the range alway stays between 0 and the length of the text,
# as the length of frames is defined by columns+len(txt)+1.
text(txt[column-frame], (x, h/2), align='center')
else:
# If the column position is not between frame-len(txt) and frame, use a dot.
# You could add random characters here.
text('.', (x, h/2), align='center')
saveImage('abcd.gif')
As I can’t see your code, I’m not sure what happens, but scale() normally translates around the origin. Maybe the output is going outside of the canvas?
It’s possible to change the center of scaling by using center=(x,y).
In the example below I chose a different solution. I used translate() to temporarily – only within savedState() – move the origin of the canvas.
font("Times-Italic", 200)
with savedState():
# translate the canvas
translate(200,500)
# Draw the black text at the (translated) origin
text("hello", (0, 0))
# Mirror the canvas
scale(1,-1)
# Draw the red text at the (translated) origin that will appear mirrored
fill(1,0,0)
text("hello", (0, 0))
y2 = y1 + row_height
Yes, I should have seen that. So much clearer.
x_positions = [random.random() * row_width for _ in range(d)]
I understand what’s happening here, but I don’t think I’m experienced enough to think this is more readable than the while loop.
I agree it is the better solution as it obviates the while loop.
Thanks @frederik
Normally I would define a minimum and maximum distance. I wouldn’t know how to do that using random.sample().
size(600, 849)
margin = 30
# Density here is defined by minimum and maximum distance between lines
density = [[100,200],[10,60],[1,3]]
rows = len(density)
row_height = (height()-2*margin) / rows
fill(None)
strokeWidth(1)
stroke(0)
for i, d in enumerate(density):
x = margin
y1 = margin + i*row_height
y2 = margin + (i+1)*row_height
while x < width()-margin:
line((x,y1),(x,y2))
x += randint(d[0],d[1])