Navigation

    • Register
    • Login
    • Search
    • Categories
    • Recent
    • Tags
    • Users
    • Groups
    • Solved
    • Unsolved
    • Search
    1. Home
    2. ThunderNixon
    3. Posts
    • Profile
    • Following
    • Followers
    • Topics
    • Posts
    • Best
    • Groups

    Posts made by ThunderNixon

    • RE: Efficient way to convert all text to outlines in a multi-page doc?

      Oh, it's probably also worth mentioning the reason I did have to outline text, for anyone who might be Googling this subject.

      The printer reported to me that they couldn't place pages from my PDF into InDesign to prep for printing, and that "ripping" the file in Adobe Acrobat also had issues. I'm not quite sure whether this was caused by my variable font (likely) or another logo-specific font I used (also possible).

      The warning he reported to me, verbatim, was:

      The document could not be saved.
      
      Bad font object or font descriptor object.
      
      posted in General Discussion
      ThunderNixon
      ThunderNixon
    • RE: Efficient way to convert all text to outlines in a multi-page doc?

      Small update here: even though it took a bit of figuring out to convert text to outlined text, I'm very glad I took that route instead of outputting hi-res bitmaps for the printer.

      If the outlines didn't work, the printer said a good backup would be 2400dpi bitmaps (this is an all black-and-white book, and bitmaps would be smaller than JPEGs/PNGs). Even though I'm only making a 3.5-inch (8.89 cm) book, these images were 282.2MB apiece. This meant that generating them was somewhat slow, and also that uploading the 208 images to Dropbox (a total of almost 60 GB) would probably take my internet connection about 20 minutes at 100 Mbps.

      I'll share the DrawBot script soon, in case anyone needs it. (If I forget and this is something you do need, please email me: stephen at arrowtype dot com).

      posted in General Discussion
      ThunderNixon
      ThunderNixon
    • RE: Efficient way to convert all text to outlines in a multi-page doc?

      I did end up going through my document and putting about 10 different types of text into bezier paths.

      I know this is the kind of feature that might be a LOT more complex to implement than I realize, but I'd love it if in the future, the saveImage function just had an optional "outline text" feature, for needs like this. 🙂

      posted in General Discussion
      ThunderNixon
      ThunderNixon
    • RE: Efficient way to convert all text to outlines in a multi-page doc?

      A few notes as I figure things out.

      I found that things had to be pretty particular for the Bezier object. I got this error a lot:

      Traceback (most recent call last):
        File "/Users/stephennixon/type-repos/recursive/src/proofs/drawbot-diagrams-etc/flipbook/recursive-flipbook-wave_viz-multistage-visualization_2-outlined_text-081419.drawbot.py", line 481, in <module>
          showAxisVals("i", italVal, i, infoHeight)
        File "/Users/stephennixon/type-repos/recursive/src/proofs/drawbot-diagrams-etc/flipbook/recursive-flipbook-wave_viz-multistage-visualization_2-outlined_text-081419.drawbot.py", line 475, in showAxisVals
          textPath.textBox(valueString,((x,y,w,h)), align="right")
        File "/usr/local/lib/python3.7/site-packages/drawBot-3.120-py3.7.egg/drawBot/context/baseContext.py", line 340, in textBox
          self.optimizePath()
        File "/usr/local/lib/python3.7/site-packages/drawBot-3.120-py3.7.egg/drawBot/context/baseContext.py", line 423, in optimizePath
          if self._path.elementAtIndex_(count - 1) == AppKit.NSMoveToBezierPathElement:
      IndexError: NSRangeException - elementAtIndex:associatedPoints:: index (-1) beyond bounds (0)
      

      And found that I needed to work in a specific order:

      • to use fontVariations, I had to setup a formatted string
      • to make the path with text show up, I had to use fill just before the drawPath function – it didn't work in the formatted string
      txt = FormattedString()
      txt.font(sans)                                                     # MUST be here
      txt.fontSize(textSize)                                             # MUST be here
      txt.fontVariations(wght=500, XPRN=xprnVals[0], slnt=0, ital=0)     # styling
      txt.align("right")                                                 # styling
      txt.append("this is my styled string")
      
      valueTextPath = BezierPath()
      fill(foreground)                                                   # MUST be here between BezierPath() setup and drawPath(), *not* in formatted string,
      valueTextPath.textBox(txt,((x,y,w,h)))
      drawPath(valueTextPath)
      
      posted in General Discussion
      ThunderNixon
      ThunderNixon
    • RE: Efficient way to convert all text to outlines in a multi-page doc?

      Ahhh this is very helpful. Thank you!

      posted in General Discussion
      ThunderNixon
      ThunderNixon
    • Efficient way to convert all text to outlines in a multi-page doc?

      I'm going to be sending a PDF specimen to a printer, but I'm somewhat concerned that the variable fonts I've used might cause problems on their end.

      Is there a way to convert an entire document (like, 200 pages of text, mostly not that complex, but complex as a whole) to outlines? I see that BezierPath() might be the answer, but I can't imagine how I'd wrap an entire document in it, if it wasn't something planned from the outset.

      My backup is to just export everything to JPEG and bring those into a PDF. Maybe this is just the better option, anyway?

      Curious whether there's some option I'm missing. 🙂 Thanks!

      posted in General Discussion
      ThunderNixon
      ThunderNixon
    • Is there a way to build "bleed" into a file, for printing?

      I'm making a book via DrawBot, and some of the pages will have a full bleed background color.

      Is there any way to add a bleed into a document (aside from changing my whole layout calculation)?

      I could imagine there being some kind of technique like this:

      W, H = 400, 400
      newPage(W,H)
      bleed = 25
      margin = 25
      
      rect(0-bleed,0-bleed,W+bleed*2,H+bleed*2)
      
      fill(1)
      textBox("Content with margin", (margin, margin, W-margin*2, H-margin*2))
      
      saveImage("/Users/stephennixon/Desktop/printready-page.pdf")
      

      However, in a quick test, it doesn't seem like that "beyond the edges" content is carried by the PDF into the Adobe Acrobat print > marks and bleeds.

      If there isn't an "easy way," is there a known way? Do I just add a quarter-inch to all pages (except for along the spine), and then just tell the printer to slice that off?

      posted in General Discussion
      ThunderNixon
      ThunderNixon
    • RE: How do I size an image with the ImageObject (or without)?

      Ahh this is a very clear-headed approach. Thanks for showing me how it's done! This is very helpful.

      posted in General Discussion
      ThunderNixon
      ThunderNixon
    • RE: How do I size an image with the ImageObject (or without)?

      I may have found a solution to this, but I'm wondering if there's something more direct.

      For now, I'm using imageObject.size() to find the image size and set the scale based on my layout:

      sizingImage = ImageObject(path="img01.jpg")
      imageScale = W/sizingImage.size()[0] / cols
      

      ...then later, using a savedState() to apply that scaling inside of a bigger loop:

      with savedState():
          scale(imageScale)            
          image(im, (x* (1/imageScale),y* (1/imageScale)))
      

      If there is (now or in the future) a way to size an image similar to a rect(), I would be really excited to learn about it, as it would be quite a bit more direct to use for layouts. Thanks!

      posted in General Discussion
      ThunderNixon
      ThunderNixon
    • RE: How do I size an image with the ImageObject (or without)?

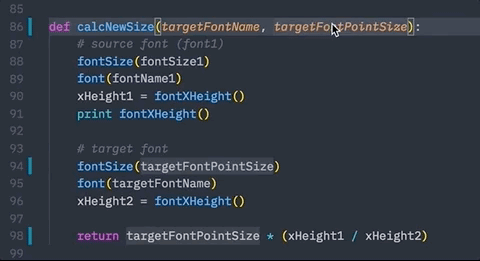
      To add a bit more detail, if I copy the suggested code from the imageObject page but add a path for the optional path arg, I get an error message.

      Error:

      Traceback (most recent call last):
        File "<untitled>", line 10, in <module>
        File "drawBot/drawBotDrawingTools.pyc", line 265, in size
      drawBot.misc.DrawBotError: Can't use 'size()' after drawing has begun. Try to move it to the top of your script.
      

      Code:

      size(550, 300)
      # initiate a new image object
      im = ImageObject("/Users/stephennixon/Downloads/stills/IMG_0769-still-0018.jpg")
      
      # draw in the image
      # the 'with' statement will create a custom context
      # only drawing in the image object
      with im:
          # set a size for the image
          size(200, 200)
          # draw something
          fill(1, 0, 0)
          rect(0, 0, width(), height())
          fill(1)
          fontSize(30)
          text("Hello World", (10, 10))
      
      # draw in the image in the main context
      image(im, (10, 50))
      # apply some filters
      im.gaussianBlur()
      
      # get the offset (with a blur this will be negative)
      x, y = im.offset()
      # draw in the image in the main context
      image(im, (300+x, 50+y))
      

      Just to confirm that I am using the correct path, it works fine to use the following code (I just wish I could figure out how to adjust the size).

      image("/Users/stephennixon/Downloads/stills/IMG_0769-still-0018.jpg", (10, 50))
      

      Thanks so much for any insights!

      posted in General Discussion
      ThunderNixon
      ThunderNixon
    • How do I size an image with the ImageObject (or without)?

      It's easy to draw an image into a page. However, I'm having trouble sizing it.

      This does nothing:

      im = ImageObject()
      
      with im:
      
          open("/Users/stephennixon/Downloads/stills/IMG_0769-still-0018.jpg")
          size(200, 200)
      
      image(im, (10, 50))
      

      Am I missing something?

      posted in General Discussion
      ThunderNixon
      ThunderNixon
    • Update font family in FormattedString

      I'm hoping to use make an instance of a FormattedString(), set its font size and content, then make multiple pages in which only the font is changed. Ulimately, I'm trying to make a type proof in as simple a way as possible.

      The code below shows my current attempt. I would expect page 1 to have Helvetica, and page 2 to have Times New Roman. However, both have Helvetica. What am I missing?

      import datetime
      timestamp = datetime.datetime.now().strftime("%Y.%m.%d – %H:%M")
      
      W, H = 792, 612
      
      font("Courier")  # caption font
      fontSize = 12    # caption font size
      
      padding = 40
      
      lower = "\
      nnannooaoo nnbnnooboo nncnnoocoo nndnnoodoo nnennooeoo nnfnnoofoo\n\
      nngnnoogoo nnhnnoohoo nninnooioo nnjnnoojoo nnknnookoo nnlnnooloo\n\
      nnmnnoomoo nnpnnoopoo nnqnnooqoo nnrnnooroo nnsnnoosoo nntnnootoo\n\
      nnunnoouoo nnvnnoovoo nnwnnoowoo nnxnnooxoo nnynnooyoo nnznnoozoo\n\
      \n"
      
      upper = "\
      HHAHHOOAOO HHBHHOOBOO HHCHHOOCOO HHDHHOODOO HHEHHOOEOO HHFHHOOFOO\n\
      HHGHHOOGOO HHIHHOOIOO HHJHHOOJOO HHKHHOOKOO HHLHHOOLOO HHMHHOOMOO\n\
      HHNHHOONOO HHPHHOOPOO HHQHHOOQOO HHRHHOOROO HHSHHOOSOO HHTHHOOTOO\n\
      HHUHHOOUOO HHVHHOOVOO HHWHHOOWOO HHXHHOOXOO HHYHHOOYOO HHZHHOOZOO\n\
      \n"
      
      nums = "\
      0080088088 0010088188 0020088288 0030088388 0040088488\n\
      0050088588 0060088688 0070088788 0090088988\n"
      
      
      # ----------------------------------------
      # Setup proof content --------------------
      
      txt = FormattedString()
      txt.fontSize(18)
      
      txt += lower
      txt += upper
      txt.openTypeFeatures(ss01=True)
      txt += lower
      txt += nums
      
      # ----------------------------------------
      # First Page -----------------------------
      
      newPage('LetterLandscape')
      
      txt.font("Helvetica")
      text(txt, (padding, H-padding))
      
      text("Helvetica – " +
           timestamp, padding, padding)
      
      # ----------------------------------------
      # Next Page ------------------------------
      
      newPage('LetterLandscape')
      
      txt.font("Times New Roman")
      text(txt, (padding, H-padding))
      
      text("Times New Roman – " +
           timestamp, padding, padding)
      
      
      # ----------------------------------------
      # Save -----------------------------------
      
      print("saving")
      path = "/Users/stephennixon/type-repos/recursive/src/proofs/drawbot-basic-proof/exports/temp.pdf"
      saveImage(path)
      
      posted in General Discussion
      ThunderNixon
      ThunderNixon
    • RE: Is it possible to typeset Arabic, including connected characters?

      @justvanrossum said in Is it possible to typeset Arabic, including connected characters?:

      textBox()

      Often it's the simplest approaches that give the answer. I should have tried that before posting!

      Turns out, it's just that my specific Arabic font won't work, rather than Drawbot being the issue. Here, it's working as expected with Adobe Myriad Arabic:

      0_1518022893320_type_media-arabic-3.gif

      I'll have to look into other reasons why an Arabic font might not render correctly (even when it does work with some apps). Thank you for your help here, though!

      posted in General Discussion
      ThunderNixon
      ThunderNixon
    • Is it possible to typeset Arabic, including connected characters?

      Is it possible to typeset Arabic script in Drawbot, getting the connections to work? Would the pointInside() function disrupt this in some way?

      The message in the gif below is supposed to say: "نوع وسائل الإعلام" (roughly, "Type and Media"), but only the non-connected letterforms are drawing, rather than initial, medial, and finial forms.

      example of arabic script with connections not working

      I could be missing something very basic. Thank you for any tips or info!

      posted in General Discussion
      ThunderNixon
      ThunderNixon
    • RE: Text editor selection niceties (esp. "Add Next Occurence" of selection)

      @frederik and @justvanrossum thanks for the thoughtful replies and helpful tips!

      Command-E and Command-G will be very useful. 🙂

      And yeah, I found that early on that DrawBot does reload pretty nicely, so probably I just need to make better use of that.

      posted in Feature Requests
      ThunderNixon
      ThunderNixon
    • RE: Animation tutorial screencast

      Or should I say...
      0_1515933534370_StackOfNice9.gif

      posted in Tutorials
      ThunderNixon
      ThunderNixon
    • RE: Animation tutorial screencast

      This video is fantastic!This is some fun code to experiment with, as well. 🙂

      posted in Tutorials
      ThunderNixon
      ThunderNixon
    • Text editor selection niceties (esp. "Add Next Occurence" of selection)

      Preamble: I realize that this is actually multiple feature requests, and that there may be valid product strategy reasoning behind not adding these features. That said, I would love these.

      In dedicated text editors such as VS Code, Sublime, and Atom, there are some super useful keyboard shortcuts that allow you to manipulate text in ways that help accelerate coding in small but helpful ways. Drawbot has some very nice abilities of its own that keep me using its editor for coding (command click-dragging / arrow incrementing of values is wonderful). Still, a few text helpers would be wonderful.

      Below is a screenshot of VS Code's "Selection" menu, which has several functions that would be helpful (I don't happen to use expand/shrink selection, but others probably do).

      The very most useful function, for me, is the ability to "Add Next Occurrence" of a word to a selection (very close to "Select All Occurrences"). This makes it really quick to do things like updating a variable name between several lines. This is also possible with a find/replace all, but that tends to take me out of a workflow significantly more because I have to figure out that bit of UI instead of just making it happen.

      0_1515927613266_selectNextOccurence.gif

      Also sometimes handy is having the ability to add multiple cursors, with shortcuts to add cursors above or below the current one. This is awesome for editing things like ASCII art or glyph recipe strings.Still, this is less of an important feature to me, because I'm happy enough opening my code in a separate editor for this kind of work. But if it were in the Drawbot (/ RoboFont) text editor, I might have to context-switch that much less!

      0_1515925982332_e1c5396b-1ae9-4ad3-b305-a5f0a99e1b53-image.png

      posted in Feature Requests
      ThunderNixon
      ThunderNixon
    • RE: Stephen Nixon's blogified class notes: a useful beginners' DrawBot tutorial

      It wasn't taken directly from class notes, but there's actually a part 3, as well:

      https://typefloundry.com/make-a-perfect-expandable-grid-in-drawbot

      posted in Tutorials
      ThunderNixon
      ThunderNixon
    • RE: Stephen Nixon's blogified class notes: a useful beginners' DrawBot tutorial

      @thom After talking with Just, I've learned that RoboFont 2 will use Python 3.6. So, I've updated the print statements, and I think those were the only 2.7-specific things. If you spot other issues, though, let me know!

      posted in Tutorials
      ThunderNixon
      ThunderNixon