Navigation

    • Register
    • Login
    • Search
    • Categories
    • Recent
    • Tags
    • Users
    • Groups
    • Solved
    • Unsolved
    • Search
    1. Home
    2. justvanrossum
    • Profile
    • Following
    • Followers
    • Topics
    • Posts
    • Best
    • Groups

    Just van Rossum

    @justvanrossum

    43
    Reputation
    64
    Posts
    1220
    Profile views
    6
    Followers
    0
    Following
    Joined Last Online
    Website dailydrawbot.tumblr.com Location Haarlem, Netherlands

    justvanrossum Follow
    drafts admin

    Best posts made by justvanrossum

    • Sliced Sphere

      Here's a little example that draws an animated sliced sphere, using fake shadow and sin() and cos() to give the illusion of 3D.

      def ellipse(center, wr, hr):
          cx, cy = center
          oval(cx - wr, cy - hr, wr * 2, hr * 2)
      
      canvasSize = 800
      radius = 0.9 * canvasSize / 2
      numEllipses = 12
      numFrames = 40
      sphereAngle = radians(20) # make radians from degrees
      ellipseHeight = sin(sphereAngle)
      heightCompensation = cos(sphereAngle)
      
      for frame in range(numFrames):
          t = (0.25 + frame / numFrames) % 1.0
          newPage(canvasSize, canvasSize)
          frameDuration(1/20)
          rect(0, 0, canvasSize, canvasSize)
          translate(canvasSize/2, canvasSize/2)
          fill(1)
          shadow((0, -canvasSize * 0.03), canvasSize * 0.03,
                 (0, 0, 0, 0.6))
      
          for i in range(numEllipses):
              f = (i + (1 - t)) / (numEllipses)
              circleY = 2 * (f - 0.5)
              wr = radius * cos(asin(circleY))
              y = heightCompensation * radius * circleY
              ellipse((0, y), wr, ellipseHeight * wr)
      
      saveImage("SlicedSphere.gif")
      

      0_1517651812685_SlicedSphere-clean.png

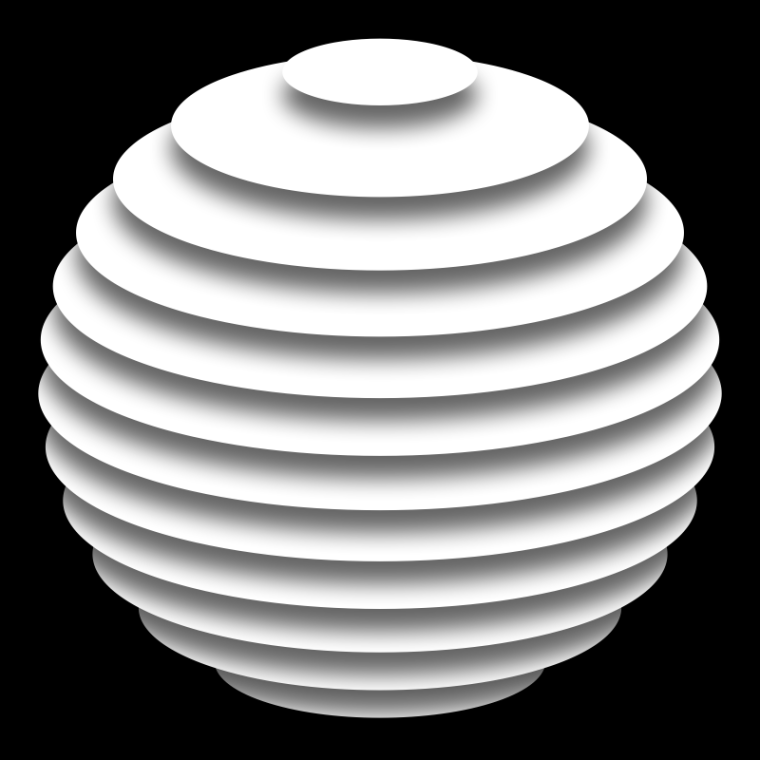
      Somehow I failed to embed an animated gif in the post. Here's the animation: http://dailydrawbot.tumblr.com/post/170450438649/sliced-sphere

      posted in Code snippets
      justvanrossum
      justvanrossum
    • RE: Drawbot on something more powerful than desktops and laptops?

      @mauricemeilleur Before you consider heavier hardware, consider whether you currently get the most out of your available computing power.

      Python doesn't utilize multiple cores, so running several processes simultaneuously can speed up things. Easiest to do this would be to run DrawBot as a module, and fire up command line scripts from Terminal. This way one could theoretically get a 4x speedup on a 4-core CPU, although in practice, some recent eperiments I did shows this may be limited to roughly a 2x speedup (possibly due to an IO bottleneck).

      Make sure you generate each frame as a new drawing, and save to disk as png, to avoid building up a huge multi page PDF in memory. Use this pattern:

      numFrames = 10
      for frame in range(numFrames):
          newDrawing()  # start from scratch, no multipage
          newPage(500, 500)
          # ... draw your frame
          saveImage("myimagefolder/myimage%d.png" % frame)
      

      Also, once it's running in Terminal, it shouldn't be in your way much (especially if you use only one process so you don't max out all available cores), and just let it compute, for hours, or days...

      To convert the image sequence to mp4, use something like:

      from drawBot.context.tools.mp4Tools import generateMP4
      
      frameRate = 25
      generateMP4("myimagefolder/myimage%d.png", "output.mp4", frameRate)
      

      Consider running this in Terminal also, so it won't block your DrawBot app.

      posted in General Discussion
      justvanrossum
      justvanrossum
    • Animation tutorial screencast

      Here's an 18 minute screencast that shows some techniques to make animations with DrawBot:

      Here is the source code:

      CANVAS = 500
      SQUARESIZE = 158
      NSQUARES = 50
      SQUAREDIST = 6
      
      width = NSQUARES * SQUAREDIST
      
      NFRAMES = 50
      
      for frame in range(NFRAMES):
          newPage(CANVAS, CANVAS)
          frameDuration(1/20)
          
          fill(0)
          rect(0, 0, CANVAS, CANVAS)
      
          phase = 2 * pi * frame / NFRAMES  # angle in radians
          startAngle = 90 * sin(phase)
          endAngle = 90 * sin(phase + 0.5 * pi)
      
          translate(CANVAS/2 - width / 2, CANVAS/2)
      
          fill(1)
          stroke(0)
      
          for i in range(NSQUARES + 1):
              f = i / NSQUARES
              save()
              translate(i * SQUAREDIST, 0)
              scale(0.7, 1)
              rotate(startAngle + f * (endAngle - startAngle))
              rect(-SQUARESIZE/2, -SQUARESIZE/2, SQUARESIZE, SQUARESIZE)
              restore()
      
      saveImage("StackOfSquares.gif")
      
      posted in Tutorials
      justvanrossum
      justvanrossum
    • RE: Blobs 101?

      @agyei the sin and cos calls are about calculating points on a circle. I should make a little tutorial about that.

      posted in Code snippets
      justvanrossum
      justvanrossum
    • The forum is back!

      Unfortunately all previous content (which wasn't much yet) and user registrations (which were already quite a few) was lost due to server issues beyond our control. Let's start afresh!

      posted in Announcements
      justvanrossum
      justvanrossum
    • Python For Designers online book

      http://pythonfordesigners.com/

      posted in Tutorials
      justvanrossum
      justvanrossum
    • Seigaiha Pattern

      0_1515483862506_SeigaihaPattern.png

      # See https://twitter.com/bicvudesign/status/950508015131734017
      
      def circle(x, y, diameter):
          radius = diameter / 2
          oval(x - radius, y - radius, diameter, diameter)
      
      def element(x, y, diameter, numCircles, relativeStrokeWidth):
          step = diameter / numCircles
          strokeWidth(relativeStrokeWidth * step)
          for i in range(numCircles):
              circle(x, y, diameter)
              diameter -= step
      
      diameter = 250
      numCircles = 6
      relativeStrokeWidth = 0.2
      numRows = 13
      numColumns = 5
      
      stroke(0.7)
      fill(1)
      
      for j in range(numRows + 4):
          y = 0.5 * diameter + 0.25 * diameter * (numRows - j)
          xOffset = 0.5 * diameter * (j % 2)
          for i in range(numColumns):
              x = diameter * i + xOffset
              element(x, y, diameter, numCircles, relativeStrokeWidth)
      
      posted in Code snippets
      justvanrossum
      justvanrossum
    • A grid of animated spirals

      0_1520364143306_SpiralGrid2-clean.gif

      def spiral(cx, cy, diameter, angle):
          with savedState():
              translate(cx, cy)
              scale(diameter / 1000)
              for i in range(100):
                  rect(406, 0, 95, 95)
                  rotate(angle)
                  scale(0.99)
      
      gridSize = 100
      margin = 50
      canvasSize = 500
      numFrames = 40
      
      for frame in range(numFrames):
          t = frame / numFrames
          newPage(canvasSize, canvasSize)
          frameDuration(1/20)
          fill(0)
          rect(0, 0, canvasSize, canvasSize)
          fill(1)
          translate(margin, margin)
          for i in range(5):
              for j in range(5):
                  a = 2 * pi * (t + (i + j) / 8)
                  angle = 31 + 2 * sin(a)
                  spiral(i*gridSize, j*gridSize, 95, angle)
      
      saveImage("~/Desktop/SpiralGrid.gif")
      
      posted in Code snippets
      justvanrossum
      justvanrossum
    • DrawBot 3.114 is released
      • The DrawBot window now has a toolbar with some handy buttons. You can turn it on or off with the "Add Toolbar" checkbox in the Preferences window.

      0_1516636677670_DBToolbarDemo.gif

      • We fixed a subtle but major problem with color pixel values in pixel output. RGB color values can now be precisely controlled for pixel image output. See issue typemytype/drawbot#171.

      • The openTypeFeatures() function now has a better way to reset the set of features, that works consistently, also with a FormattedString objects. See issue typemytype/drawbot#169. Similar changes have been made to the fontVariations() function.

      posted in Announcements
      justvanrossum
      justvanrossum
    • RE: A little arcTo() and geometry help?

      Partial explainer of what that code does: https://twitter.com/justvanrossum/status/1192324084656476160

      posted in General Discussion
      justvanrossum
      justvanrossum

    Latest posts made by justvanrossum

    • RE: A little arcTo() and geometry help?

      Partial explainer of what that code does: https://twitter.com/justvanrossum/status/1192324084656476160

      posted in General Discussion
      justvanrossum
      justvanrossum
    • RE: A little arcTo() and geometry help?

      @MauriceMeilleur Have a look at https://github.com/typemytype/outlinerRoboFontExtension/blob/master/Outliner.roboFontExt/lib/outlinePen.py#L518 which solves more or less the same problem. Esp. the handleLength part should be of interest to you.

      posted in General Discussion
      justvanrossum
      justvanrossum
    • Python For Designers online book

      http://pythonfordesigners.com/

      posted in Tutorials
      justvanrossum
      justvanrossum
    • Here's a good tutorial for people just starting out with DrawBot

      https://learn.adafruit.com/getting-started-with-drawbot?view=all

      posted in Tutorials
      justvanrossum
      justvanrossum
    • RE: Using a virtualenv in Drawbot

      Oh, I've been trapped by a bot it seems 😞 Still, my answer may be useful 🙂

      posted in General Discussion
      justvanrossum
      justvanrossum
    • RE: Using a virtualenv in Drawbot

      Oh, that's a clever idea, thanks for sharing.

      ... said in Using a virtualenv in Drawbot:

      import sys
      sys.path.insert(0, "/Users/maartenidema/t_venv/lib/python3.6/site-packages")

      You should be able to make that happen automatically. Please try the following:

      • Create a folder called /Library/Python/3.6/site-packages if it doesn't already exists
      • place a file in there with a .pth extension, say my_venv.pth
      • write the line /Users/maartenidema/t_venv/lib/python3.6/site-packages into that file
      • Restart DrawBot and see if you can now import from your venv.

      Sorry, I didn't test this. Please let us know if it works.

      posted in General Discussion
      justvanrossum
      justvanrossum
    • Rotating arrows exercise

      This is by no means an original idea, but it's a fun thing to program.

      Triggered by Mike Duggan: https://twitter.com/mickduggan/status/1090577885067386880

      Arrows.gif

      # triggered by Mike Duggan:
      # https://twitter.com/mickduggan/status/1090577885067386880
      
      def arrow(center, size, rotation, barThickness, arrowhead):
          with savedState():
              translate(*center)
              scale(size)
              rotate(rotation)
              points = [
                  (-0.5, barThickness/2),
                  (0.5 - arrowhead, barThickness/2),
                  (0.5 - arrowhead, 0.5),
                  (0.5, 0),
                  (0.5 - arrowhead, -0.5),
                  (0.5 - arrowhead, -barThickness/2),
                  (-0.5, -barThickness/2),
              ]
              polygon(*points)
      
      def arrowGrid(numArrows, arrowSize, barThickness, arrowhead, rotation):
          for i in range(numArrows):
              x = i * arrowSize
              for j in range(numArrows):
                  y = j * arrowSize
                  arrow((x, y), arrowSize, rotation, barThickness, arrowhead)
      
      def easeInOut(t):
          assert 0 <= t <= 1
          return (1 - cos(t * pi)) / 2
      
      canvasSize = 400
      numArrows = 4
      arrowSize = canvasSize / numArrows
      barThickness = 0.5
      arrowhead = 0.5
      rotation = 180
      
      duration = 4
      framesPerSecond = 15
      numFrames = duration * framesPerSecond
      
      for frame in range(numFrames):
          t = 4 * frame / numFrames
          quadrant = floor(t)
          t = easeInOut(t % 1)
          angle = ((quadrant + t) * 90) % 380
          flip = quadrant % 2
          angle = -angle
      
          newPage(canvasSize, canvasSize)
          frameDuration(1/framesPerSecond)
      
          if flip:
              fill(1)
              rect(0, 0, canvasSize, canvasSize)
              fill(0)
              arrowGrid(numArrows + 1, arrowSize, barThickness, arrowhead, angle)
          else:
              fill(0)
              rect(0, 0, canvasSize, canvasSize)
              fill(1)
              translate(-arrowSize/2, -arrowSize/2)
              arrowGrid(numArrows + 2, arrowSize, 1 - barThickness, arrowhead, angle + 180)
      
      saveImage("Arrows.gif")
      
      posted in Tutorials
      justvanrossum
      justvanrossum
    • RE: qCurve

      @mauricemeilleur You're seeing the representation of your shape as cubic beziers. The quads get converted to cubic because the underlying NSBezierPath doesn't support quadratic curves.

      posted in General Discussion
      justvanrossum
      justvanrossum
    • RE: qCurve

      @mauricemeilleur It's part of the "pen protocol" which lives in with FontTools, so any documentation should go there. It's documented in the code, have a look at the basePen.py module:

      https://github.com/fonttools/fonttools/blob/ca92b172f59356c38ac8d201129fb3a22512fac8/Lib/fontTools/pens/basePen.py#L80

      The main trick for the blobs is indeed the fact that the contour will have no on-curve points, and that is achieved by passing None as the last argument to pen.qCurveTo().

      posted in General Discussion
      justvanrossum
      justvanrossum
    • RE: Drawing glyphs from ufo file.

      @rafalbuchner This should work:

      def drawGlyph(g):
          bez = BezierPath()
          g.draw(bez)
          drawPath(bez)
      
      posted in General Discussion
      justvanrossum
      justvanrossum