Navigation

    • Register
    • Login
    • Search
    • Categories
    • Recent
    • Tags
    • Users
    • Groups
    • Solved
    • Unsolved
    • Search
    1. Home
    2. frederik
    • Profile
    • Following
    • Followers
    • Topics
    • Posts
    • Best
    • Groups

    Frederik Berlaen

    @frederik

    admin

    68
    Reputation
    193
    Posts
    1107
    Profile views
    4
    Followers
    1
    Following
    Joined Last Online
    Website www.typemytype.com Age 39

    frederik Follow
    drafts admin

    Best posts made by frederik

    • DrawBot 3.112 Release

      A new version is available:

      • The launch time is now at lightning speed!

      • Added a new keyword argument center for the rotate(), scale(), and skew() functions.

      The optional center argument will make the transformation be centered around the given point:

      rotate(20, center=(500, 500)) # rotate around (500, 500)
      rect(250, 250, 500, 500)
      

      Just for reference: the extra argument does the same as this example but is a lot more convenient:

      # define a center point
      centerX, centerY = 500, 500
      # translate to that center point
      translate(centerX, centerY)
      # do the transformation
      rotate(20)
      # translate back 
      translate(-centerX, -centerY)
      # draw something
      rect(250, 250, 500, 500)
      

      Download and Play!!!

      posted in Announcements
      frederik
      frederik
    • RE: Generate animated .gifs, .pdfs similar to generateMP4()?

      that is possible you can use:

      from drawBot.context.tools.gifTools import generateGif
      
      generateGif(gifPaths, destinationPath, frameRates)
      # gifPaths: a list of paths to gif files
      # destinationPath: a path where to save the animated gif
      # frameRates: a list with the same length as the gifPaths of ints in 1/100sec
      

      see https://github.com/typemytype/drawbot/blob/master/drawBot/context/tools/gifTools.py#L11

      hope this works!

      posted in General Discussion
      frederik
      frederik
    • DrawBot 3.122 is released
      • Adding bezierPath.expandStroke(width, lineCap="round", lineJoin="round", miterLimit=10) (thanks to Bahman Eslami)

      • Improved internal OpenType feature tags setting

      • Improved complex formattedString type setting

      • Improved alignment with text() and FormattedString

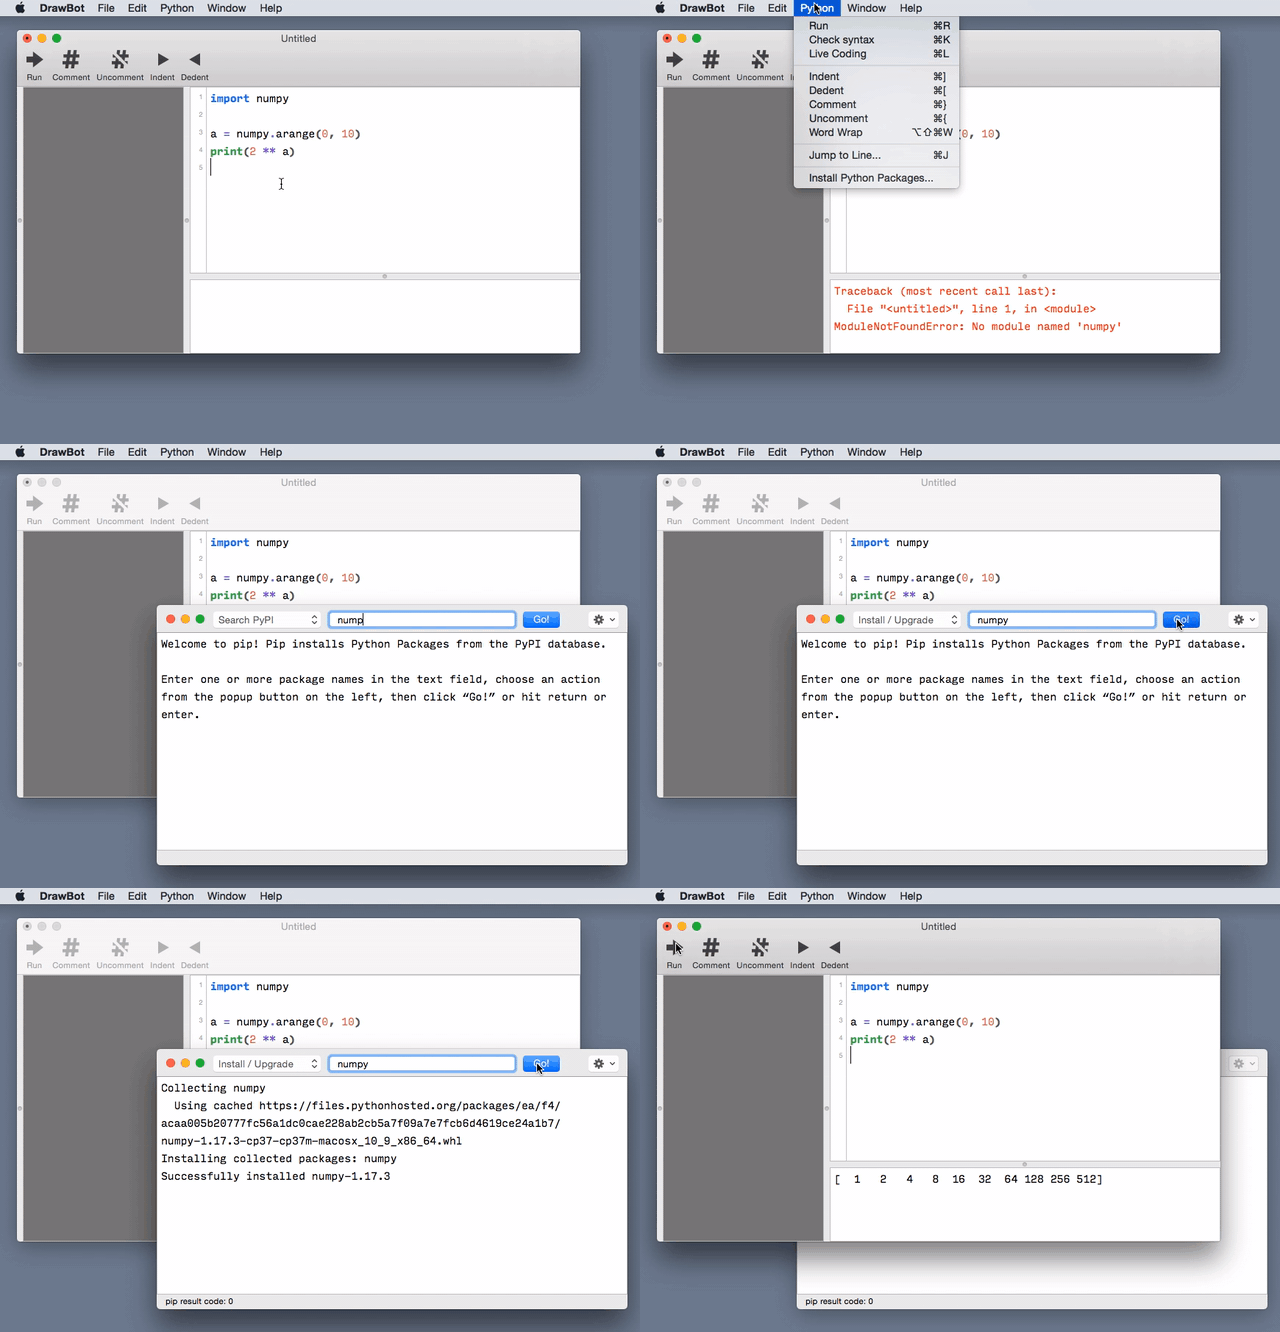
      • Added a DrawBot frontend for pip/PyPI to make it super easy to install third-party packages: see menu Python -> Install Python Packages...

        DrawBotPipDemo.gif

      • Fixed text stroke behavior (but is a breaking change): strokeWidth on text no longer scales with the fontSize

      • Removed support for .mov export on 10.15 and up (QTKit is no longer supported there)

      • Fixed extracting single frames from .gif files

      • Improved setup.py, so drawbot-as-a-module can be easily installed with pip using a github URL

      • All test now run on Travis CI (and soon also on GitHub Actions)

      • Removed Python 2 code

      • Many small issues were fixed

      posted in Announcements
      frederik
      frederik
    • DrawBot3.121 is released
      • Jumping to python 3.7

        If you use external packages you will need to install them for python 3.7. If you don't have python 3.7 installed you will need to do that first.

      • Improved syntax highlighting for python 3

      • Fallback fonts are also used in a svg context.

      • listNamedInstances() lists all named instances for a variable font.

      • BezierPath objects have bezierPath.line(pt1, pt2) and bezierPath.polygon(pt1, pt2, ...) methods.

      • Update internal packages!

      posted in Announcements
      frederik
      frederik
    • RE: Are there any tutorials on how to build Drawbot python files via Sublime?

      you could save the result to disk and open the result in an specified app with:

      from drawBot import *
      
      fill(random(), random(), random())
      rect(10, 10, 100, 100)
      
      path = "~/Desktop/test.pdf"
      saveImage("~/Desktop/test.pdf")
      
      import os
      os.system(f"open --background -a Preview {path}")
      
      posted in General Discussion
      frederik
      frederik
    • RE: arcTo documentation?

      I understand the confusion 🙂

      a much better explanation:

      The created arc is defined by a circle inscribed inside the angle specified by three points: the current point, the fromPoint parameter, and the toPoint parameter (in that order). The arc itself lies on the perimeter of the circle, whose radius is specified by the radius parameter. The arc is drawn between the two points of the circle that are tangent to the two legs of the angle.
      The arc usually does not contain the points in the fromPoint and toPoint parameters. If the starting point of the arc does not coincide with the current point, a line is drawn between the two points. The starting point of the arc lies on the line defined by the current point and the fromPoint parameter.

      https://developer.apple.com/documentation/appkit/nsbezierpath/1520737-appendbezierpathwitharcfrompoint

      I will adjust the drawBot documentation

      posted in General Discussion
      frederik
      frederik
    • RE: while()

      This is savedState() http://www.drawbot.com/content/canvas/state.html#drawBot.savedState

      with savedState():
          # do something
      

      This is more readable and clearer then wrapping code inside a save / restore statement.

      posted in General Discussion
      frederik
      frederik
    • RE: What's the main difference between py2 vs py3?

      For beginners there is not such a big difference:

      Strings

      All strings are unicode string, so no converting back and forth, but this is actually the best thing!!

      print

      print('hello world') requires brackets ( and )

      divisions

      Divisions are always floats so no more rounding, this is also a good thing: 1/3-> 0.333333 instead of 0

      You keep the old behaviour with 1//3

      If you dive deeper:

      dictionaries

      dict.keys(), dict.values(), dict.items() are not a lists anymore

      Looping (a for loop or a while loop) over a dictionary and changing content of that dictionary is tricky:

      for key in list(myDict.keys()):
          myDict[key] = "changed" + myDict[key]
      

      There is of course more

      • Python2 or Python3
      • What's New
      • google it 🙂
      posted in General Discussion
      frederik
      frederik
    • RE: Stephen Nixon's blogified class notes: a useful beginners' DrawBot tutorial

      @thundernixon ssssht py3.6 🙂

      posted in Tutorials
      frederik
      frederik
    • RE: Impossible typefaces?

      there are plainly of references in generative art, going from artist like Sol Lewit to graphic designers Juriaan Schrofer and many more.

      good luck!!

      posted in Code snippets
      frederik
      frederik

    Latest posts made by frederik

    • RE: Get location of added letter to FormattedString

      indeed, letters are collected into glyph runs with the same drawing attributes, so if you change a thing (like fill color) then you will get a box for each letter.

      good luck!

      posted in General Discussion
      frederik
      frederik
    • RE: Get location of added letter to FormattedString

      I don't know what you are trying to do but textBoxCharacterBounds is really handy to retrieve typesetted information.

      help(textBoxCharacterBounds)
      
      
      t = FormattedString()
      t.fontSize(50)
      t += "hello"
      
      t.font("Times")
      t.fill(1, 1, 0)
      t += " world"
      t.font("Times-Bold")
      t.fill(1, 0, 0)
      t += " fooj"
      
      textBox(t, (0, 0, 400, 400))
      
      textRects = textBoxCharacterBounds(t, (0, 400, 400, 400))
      
      
      for textRect in textRects:
          x, y, w, h = textRect.bounds
          
          fill(random(), random(), random(), .3)    
          rect(x, y - textRect.baselineOffset, w, h)
          
          text(textRect.formattedSubString, (x, y))
      
      posted in General Discussion
      frederik
      frederik
    • RE: Show Tabs in Editor

      moving this into a github issue

      follow up here: https://github.com/typemytype/drawbot/issues/417

      posted in Feature Requests
      frederik
      frederik
    • RE: Show Tabs in Editor

      this would be handy 🙂

      how to add it:

      Create a custom NSLayoutManager for the code editor and overwrite drawGlyphsForGlyphRange_atPoint_ and draw something like a rainbow or dots or ...

      also see https://github.com/coteditor/CotEditor/blob/89afb53f207309bfee2b1070ada3f258e1e0d6ef/CotEditor/Sources/LayoutManager.swift#L312

      posted in Feature Requests
      frederik
      frederik
    • RE: Is it possible do this processing.gif in drawbot?

      @pi said in Is it possible do this processing.gif in drawbot?:

      @frederik: Why is it 0.38?

      the handle of the off curve is 38% of the distance between the oncurve points, that seems to be generating nice curves 🙂

      posted in General Discussion
      frederik
      frederik
    • RE: Is it possible do this processing.gif in drawbot?

      an other solution!

      # amount of corners, 6 will create a hexagon
      corners = 6
      # the radius of the circle
      radius = 100
      # amount of frames
      frames = 24
      # calculate the step in radians of each corner
      angleStep = pi * 2 / corners
      # calculate the distance between each point on the circle
      # based on the cos, sin of the angle the opposite 'c' can be
      # calculated with pythagoras 
      distance = sqrt((radius - cos(angleStep) * radius) ** 2 + (sin(angleStep) * radius) ** 2)
      # calculate the offcurve handle length
      offCurveLength = distance * 0.38
      # the extremes of factors we would like to use
      minFactor = .3
      maxFactor = 2 
      # start the loop
      for i in range(frames):
          # calculate a factor and normalize so it goes from 0 -> 1 -> 0
          # to create a loop
          factor = i / (frames) * 2
          if factor > 1:
              factor = 2 - factor
          # interpolate the factor with our min max settings
          factor = minFactor + (maxFactor - minFactor) * factor
          # create a new page
          newPage(radius * 4, radius * 4)
          # draw a white background (gifs dont have an alpha value)
          with savedState():
              fill(1)
              rect(0, 0, width(), height())
          # translate to the middle
          translate(width() / 2, height() / 2)
          # create a pen
          pen = BezierPath()
          # use the pen as a point pen
          # so we can just add point instead of segments
          pen.beginPath()
          # start a loop over all corners
          for i in range(corners):
              # get the angle of each corner
              angle = angleStep * i    
              # get the x, y position based on the angle and radius    
              x = cos(angle) * radius
              y = sin(angle) * radius            
              # get the off curces based on the hooked angle (+90°) 
              # and multiply by the factor         
              offx1 = (x + cos(angle + pi / 2) * offCurveLength) * factor
              offy1 = (y + sin(angle + pi / 2) * offCurveLength) * factor
                  
              offx2 = (x - cos(angle + pi / 2) * offCurveLength) * factor
              offy2 = (y - sin(angle + pi / 2) * offCurveLength) * factor
              # add the point to the point pen path
              pen.addPoint((offx2, offy2))
              pen.addPoint((x, y), segmentType="curve")
              pen.addPoint((offx1, offy1))        
          # tell the path the drawing is done
          pen.endPath()
          # draw the path
          stroke(1, 0, 1, 1)
          strokeWidth(10)
          fill(None)
          drawPath(pen)
      # save the gif
      saveImage("circleHex.gif")
      

      circleHex.gif

      posted in General Discussion
      frederik
      frederik
    • RE: Tutorial Request: Delay Animation

      cool !

      posted in Tutorials
      frederik
      frederik
    • RE: Inspired by Vera Molnar

      cool, thanks for sharing!

      posted in Code snippets
      frederik
      frederik
    • RE: Tutorial Request: Delay Animation

      test.gif

      the resulting animated gif

      posted in Tutorials
      frederik
      frederik
    • RE: how to code a gif making a picture transform from small to large and rotate

      hope this example is clear enough!

      testImage.gif

      # path to an image
      path = 'https://github.com/typemytype/drawbot/raw/master/docs/content/assets/drawBot.jpg'
      # get the width and height of the image
      canvasWidth, canvasHeight = imageSize(path)
      # amount of frames
      frameCount = 24
      # start the loop
      for frame in range(frameCount):
          # calculate a factor, number between 0 - 1
          # going from 0 - 1 - 0
          frameFactor = frame / (frameCount) * 2        
          if frameFactor > 1:
             frameFactor = 2 - frameFactor 
          # create a new page, based on the image size
          newPage(canvasWidth, canvasHeight)
          # set frame duration in second only when the full image is shown
          if frameFactor == 1:
              frameDuration(1)
          else:
              frameDuration(.05)
          
          # easin
          frameFactor = frameFactor * frameFactor
          # translate to the middle
          translate(canvasWidth/2, canvasHeight/2)
          # scale from the middle
          scale(frameFactor)
          # rotate from the middle
          rotate(360 * frameFactor * 10)
          # translate back away from the middle
          translate(-canvasWidth/2, -canvasHeight/2)
          # draw the image
          image(path, (0, 0))
      # save as gif
      saveImage("testImage.gif")
      
      posted in General Discussion
      frederik
      frederik